ActiveRecord::Observers 101

“A common side effect of partitioning a system into a collection of cooperating classes is the need to maintain consistency between related objects. You don’t want to achieve consistency by making the classes tightly coupled, because that reduces their reusability.”

Design Patterns: Elements of Reusable Object-Oriented Software

Active Record Observers are a great tool for when we want to monitor an event occurence and take action, and especially when that event concerns multiple classes.

Active Record callbacks vs. ActiveRecord::Observers

Active Record’s built in callback helper methods can easily hook into the object lifecycle to affect change. However, when callbacks affect objects outside the model, we end up violating the single responsibility principle, so we try to avoid them if we can. Using observers brings back single responsibility to models while still allowing us to still hook into the object lifecycle.

The Observer is a central place outside of the original class to watch for database changes. By extracting that logic outside of the model, we bring back single responsibility and avoid commingling models. Observers only report or take action on a process, and should not affect a process directly.

ActiveRecord::Observer is an implementation of the Observer pattern. It was removed from core in Rails 4.0 but is now available as a gem.

Example: Callbacks

In the example below, we’re referencing MessageMailer in the User class, increasing the User class’s responsibility:

1
2
3
4
5
6
7
8
class User
after_create :notify
protected
def notify
MessageMailer.send_welcome_email(self).deliver
end
end
Example: Observers

Alternatively, by using observers in the example below, we extract the MessageMailer logic out of User and put it in its own class, UserObserver, that watches for an event and dispatches an action accordingly:

1
2
3
4
5
class UserObserver < ActiveRecord::Observer
def after_create(user)
MessageMailer.send_welcome_email(user)
end
end
Example: Observing multiple classes

Observers are especially helpful in cases like the below where there are multiple models commingled and we want to hook into all of them to watch for some event. We can pull logic out of models where it doesn’t belong, put it in its own separate place, observe actions, and still affect change as needed.

1
2
3
4
5
6
7
class AuditObserver < ActiveRecord::Observer
observe :account, :balance
def after_update(record)
AuditTrail.new(record, "UPDATED")
end
end

AR::Observers and invisibility

One thing to keep in mind with observers is that there is no visible reference to the observer in the observed class. Since we now have unseen side effects that are not readily apparent in our observed class, it can be less clear what’s happening.

When to use AR::Observers

Active Record Observers are useful when we want to stay updated on a certain process, and especially when we have multiple classes involved in an event.

They require very little setup, and since they are Active Record objects, they come rolled up with the functionality of Active Record.

When not to use AR::Observers

It’s also possible to overuse observers. If there is just one thing that happens, we probably don’t need to use observers.

For example, in our first code sample where we send a welcome email after a new user is created, the events are probably simple enough that we don’t actually need an observer. The same use case can be handled by extracting a service object like UserNotifier.

However, if you want mutiple additional actions to take place after the user is created, it may be worth using an observer.

References

Rails::Observers
Giant Robots Smashing Into Other Robots: 13: I’ll disagree in just a little bit
Upcase: The Weekly Iteration: Callbacks
Design Patterns In Ruby
Design Patterns: Elements of Reusable Object-Oriented Software

Fun With Ruby on Rails

For the past few months I’ve immersed myself into the JavaScript/React/Redux world and even turned a bit into a JavaScript fanboy. However, I recently had the opportunity to take a break from JavaScript and built a vanilla Ruby On Rails app, and I rediscovered the speed, simplicity, and fun of building with Rails. I came across some extra fun Rails helper methods, tips, and tricks and I want to share because we all deserve a little more joy in this world, amirite?

Rails helper: time_ago_in_words

The Rails ActionView date helper time_ago_in_words takes an argument, for example, Time.now and outputs elapsed time since the input in prose. How fun is that?!

Some examples from the documentation:

1
2
3
4
5
6
7
8
9
10
11
time_ago_in_words(3.minutes.from_now) # => 3 minutes
time_ago_in_words(3.minutes.ago) # => 3 minutes
time_ago_in_words(Time.now - 15.hours) # => about 15 hours
time_ago_in_words(Time.now) # => less than a minute
time_ago_in_words(Time.now, include_seconds: true) # => less than 5 seconds
from_time = Time.now - 3.days - 14.minutes - 25.seconds
time_ago_in_words(from_time) # => 3 days
from_time = (3.days + 14.minutes + 25.seconds).ago
time_ago_in_words(from_time) # => 3 days

An alias for the time_ago_in_words method is distance_of_time_in_words_to_now.

Rails helper: to_sentence

The Rails helper to_sentence takes an array and converts it to a comma separated sentence, where the last element is joined by a connector word, for example:

1
2
3
4
5
6
7
8
9
10
[].to_sentence # => ""
['one'].to_sentence # => "one"
['one', 'two'].to_sentence # => "one and two"
['one', 'two', 'three'].to_sentence # => "one, two, and three"
['one', 'two'].to_sentence(two_words_connector: '-')
# => "one-two"
['one', 'two', 'three'].to_sentence(words_connector: ' or ', last_word_connector: ' or at least ')
# => "one or two or at least three"

Joyous! Here’s the documentation.

Rails helper: div_for

The helper div_for works very similarly to form_for but is specifically for divs. Div_for creates a div element with an id and class parameters that reference the specified Active Record object. Particularly useful if you want to iterate through a collection of divs.

Here’s a quick example:

1
2
3
<%= div_for(@article, class: "frontpage") do %>
<td><%= @article.title %></td>
<% end %>

Note: With Rails 5, div_for was removed from core Rails and moved to the record_tag_helper gem.

Rails migrations: t.belongs_to in table migration

Did you know that you can include belongs_to in your table migrations?

By including belongs_to in your migration, the Rails generator knows to add the corresponding belongs_to in the object model.

In the following example…

1
2
3
4
5
6
7
8
9
10
11
12
13
14
15
class CreateProducts < ActiveRecord::Migration
def self.up
create_table :products do |t|
t.belongs_to :category
t.string :name
t.decimal :price
t.text :description
t.timestamps
end
end
def self.down
drop_table :products
end
end

… including t.belongs_to :category produces the corresponding model:

1
2
3
class Product < ActiveRecord::Base
belongs_to :category
end

Rad.

Adding belongs_to in your table migrations is also an alias for t.references. Read more about Rails associations here.

Rails migrations: def up / def down vs. def change

You may have noticed in the example above that Ryan Bates is using def up and def down vs. def change.

In most cases, Rails can guess the reverse of your migration, for example, create_table and drop_table, and add_column and remove_column. There, writing your migrations with def change makes sense and Rails will know the reverse and execute it on rails db:rollback. See the Rails guide on using the change method for a list of all supported migration definitions.

However, in cases where Rails can’t automatically match the reverse action, be specific and write separate up and down migration definitions.

For example, if you wanted to change the precision of a decimal point in your database, Rails couldn’t automatically guess the original precision on rollback, and separate up/down migration definitions are required. Here’s the code:

1
2
3
4
5
6
7
8
9
class AddDetailsToProducts < ActiveRecord::Migration
def self.up
change_column :products, :price, :decimal, precision: 10, scale: 2
end
def self.down
change_column :products, :price, :decimal, precision: 5, scale: 2
end
end

Rails routes: resource vs. resources

Lastly, you may have seen routes defined with resources, but there’s also an option called resource. The difference is subtle but an important semantic one that signals to other developers your intent and what they can expect from the application.

You would use the singular resource to indicate that only a single resource will ever exist, for example a user dashboard. Two differences in behavior to note with the singular resource:

  1. resource does not define routes with an id, since a singular resource does not need serialized ids
  2. singular resources still map to plural controllers

Below is an example of routes with a singular resource adapted from the Rails guide on singular resources:

HTTP Verb Path Controller#Action Used for
GET /dashboard/new dashboards#new return an HTML form for creating the dashboard
POST /dashboard dashboards#create create the new dashboard
GET /dashboard dashboards#show display the one and only dashboard resource
GET /dashboard/edit dashboards#edit return an HTML form for editing the dashboard
PATCH/PUT /dashboard dashboards#update update the one and only dashboard resource
DELETE /dashboard dashboards#destroy delete the dashboard resource

Refs, React & Redux

As my classmates and I expand our React skills to follow the Redux pattern, we are moving to a paradigm where we let the global store manage state and moving away from dealing with the state directly. However, there are a few exceptions, one of which is how to deal with user input from a form. Here’s one example of how to handle user input with vanilla React:

1
2
3
4
5
6
7
8
9
10
11
12
13
14
15
16
17
18
19
20
21
22
23
24
25
class NoteCreate extends React.Component {
constructor(props){
super(props)
this.state = {note: ''}
}
handleInputChange(event){
this.setState({
note: event.target.value
})
}
render(){
return (
<div>
<h3>Add a Note</h3>
<form onSubmit={this.handleSubmit.bind(this)}>
<input type='text' onChange={this.handleInputChange.bind(this)} value={this.state.note}/>
<input type='submit' />
</form>
</div>
)
}
}

In the code above we’re using setState() on a specific component to set the value of the user input from the form and managing that state locally in the component.

From a Redux Point of view, this is totally fine for organizing state, and the Redux docs on Organizing State say as much:

Do I have to put all my state into Redux? Should I ever use React’s setState()?

There is no “right” answer for this. Some users prefer to keep every single piece of data in Redux, to maintain a fully serializable and controlled version of their application at all times. Others prefer to keep non-critical or UI state, such as “is this dropdown currently open”, inside a component’s internal state. Using local component state is fine. As a developer, it is your job to determine what kinds of state make up your application, and where each piece of state should live. Find a balance that works for you, and go with it.

However, for me personally, managing state in a child component while also using the Redux pattern is a little bit outside the mental model that I’m working toward and a bit of an anti-pattern that I would like to avoid. As a result, I approached managing form input differently, using a ref to capture the user input. See below:

1
2
3
4
5
6
7
8
9
10
11
12
13
14
15
16
17
18
19
20
class NoteCreate extends React.Component {
handleNewNote(event) {
event.preventDefault()
const text = this.noteText.value
this.props.store.dispatch({type: 'ADD_NOTE',note: text })
}
render(){
return (
<div>
<h3>Add a Note</h3>
<form onSubmit={this.handleNewNote.bind(this)}>
<input type='text' ref={(input) => this.noteText = input} />
<input type='submit' />
</form>
</div>
)
}
}

In this case, I’m using a ref callback to store a reference to the DOM element, then dispatching that value directly to the store, as opposed to managing the state locally with setState() in that component.

Tradeoffs

The tradeoff between the setState() approach and the ref approach is that with setState() you are tracking state with a child component, but with refs even though you are sending state directly to the store, you are also directly accessing the DOM to pull that value. Neither option is 100% compliant to the React/Redux pattern, so it’s a matter of preference where to break convention - do what feels best for your mental model and your project.

A third way to approach the task is with the mindset that form state is something that should be managed on the application level state, and accordingly build out a form reducer that updates the current value of the form.

Refs and focus()

Refs can be useful in a few other contexts:

  • Managing focus, text selection, or media playback.
  • Triggering imperative animations.
  • Integrating with third-party DOM libraries.

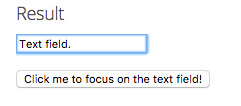
Let’s take a look at the first case, managing focus. Using a ref to access the DOM is a great solution for when we have a simple HTML form and want to focus the form field when a user clicks or is otherwise moving through the form:


1
2
3
<input type="text" id="myTextField" value="Text field.">
<p></p>
<button type="button" onclick="focusMethod()">Click me to focus on the text field!</button>
1
2
3
focusMethod = function getFocus() {
document.getElementById("myTextField").focus();
}

In this case, you would want to use a ref since you do want to directly reference that DOM element.

In general, refs should be used sparingly, and only really if you can’t do something declaratively. But there are a few cases when they are very useful!

Reference

Do I have to put all my state into Redux? Should I ever use React’s setState()?
http://redux.js.org/docs/faq/OrganizingState.html

Refs and the DOM
https://facebook.github.io/react/docs/refs-and-the-dom.html

The Absolute Beginner Basics of Getting Set Up With Sass

When I was first learning Sass, I experienced a bit of frustration trying to get started and get my environment set up. This blog post is intended for Sass absolute beginners who are looking to get set up and write their very first Sassy CSS.

A basic definition of Sass

Sass stands for Syntactically Awesome Style Sheets, and it is an extension of CSS (Cascading Style Sheets). The latest version of Sass is saved with a .scss extension vs. CSS’s .css extension.

Sass builds on CSS and provides a ton of extra features to improve efficiency, productivity, and help you and your codebase subscribe to the “don’t repeat yourself” (DRY) principle.

Installing Sass via command line

Installing Sass via Mac command line is simple. Sass has a Ruby dependency but if you’re on a Mac, you’ve already got Ruby installed! Simply type gem install sass in your command line, or if that doesn’t work, try sudo gem install sass. To confirm that your installation was successful, type sass -v and you should see the current version of Sass that you’ve just installed.

If you’re having problems, or to install Sass with other operating systems, see the official Install Sass documentation.

Creating your first Sass file

There are many ways to think about and to structure your Sass files, and I’ll touch on those in a bit, but in order to get started, all you really need is a single .scss file, and you can name it whatever you want, for example, style.scss. Create a new file with your favorite code editor and give it the file extension .scss.

When to convert SCSS files to CSS

Depending on your project setup, you may or may not need to convert your .scss files to .css.

If you have a Ruby on Rails project, Rails will compile Sass for you so you won’t have to do it manually. Similarly, when using React, there are packages you can install that will manage your Sass files for you.

If you are building a project with only HTML, CSS, maybe JavaScript files, and are not using any frameworks or libraries, you will need to compile your Sass files to CSS. To learn how, see below.

How to convert your SCSS files to CSS

To manually compile your Sass to CSS, you can set up your workflow so that Sass automatically keeps track of your Sass file and converts it to the CSS version every time a change is made. In order to do that, you need to have Sass “watch” for changes. Since we are starting simple and only have one file, set up Sass to watch for changes by typing in your command line, in your project folder:

1
sass --watch style.scss:style.css

In the code above, you are telling Sass to watch the file style.scss, which is where you will be writing your Sassy CSS, and to convert it to a file called style.css which will be created the first time a change happens. You do not need to create the style.css file manually.

And that’s it! Every time you add or make a change to your style.scss file, Sass is watching and knows to update the corresponding file, in this case style.css. If at any time, you want to change the files that are being watched, you can run sass --watch again with the new filenames.

As your project grows and you amass multiple SCSS files, you’ll want to set up your sass --watch to watch an entire directory vs. a specific file, but that is a blog post for another time. You can also check out this blog post on Sass Break that goes into more detail about the different ways you can use --watch.

Writing your first SCSS code

We made it! It’s time to write some Sassy CSS!

The core of writing CSS has not changed, and a lot of the styles you’ll write will likely look like vanilla CSS. However, beyond that, two of the big benefits that SCSS gives you are:

  1. Nested selectors that eliminate redundancy and keep your code DRY, and
  2. The ability to use variables for commonly used code (for example, colors). Let’s look at an example below:

Before Sass, vanilla CSS:

1
2
3
4
5
6
7
8
9
10
11
12
13
14
.post {
border-radius: 3px;
background: #FFF8FF;
border: 1px solid #EFC6F3;
padding: 15px;
color: #333333;
}
.post .title, .post .alt-title {
color: #000000;
font-size:20px;
}
.post .alt-title {
border-bottom:1px solid #EFC6F3;
}

After Sass:

1
2
3
4
5
6
7
8
9
10
11
12
13
14
15
16
$border: 1px solid #EFC6F3;
.post {
border-radius: 3px;
background: #FFF8FF;
border: $border;
padding: 15px;
color: #333333;
.title {
color: #000000;
font-size: 20px;
}
.alt-title {
@extend .title;
border-bottom: $border;
}
}

You can see in the second Sass example that there’s less repeated code since we’re nesting selectors within their parents.

Sass also lets you define variables for colors, for example, in the code sample above we can set #EFC6F3 to a variable and call that $light-pink. We can then access it like so:

1
2
3
4
5
6
7
8
9
10
11
12
13
14
15
16
17
18
$light-pink: #EFC6F3;
$border: 1px solid $light-pink;
.post {
border-radius: 3px;
background: #FFF8FF;
border: $border;
padding: 15px;
color: #333333;
.title {
color: #000000;
font-size: 20px;
}
.alt-title {
@extend .title;
border-bottom: $border;
}
}

If later we decide that we actually want to use #FFB6C1 for our $light-pink hex, we only need to change the variable in one place, and the rest of the codebase is updated accordingly, saving us valuable time!

There are so many more fun features of Sass, and awesome frameworks to use with it, but I think I’ll leave it there for now. Go forth, explore, and share your Sass creations with me!

Bonus: Setting up folder structures for Sass

Let me lead with the headline for this section: I purposely wanted to keep this post super simple for those who are just starting out. If you only have one SCSS file, you don’t need to set up folder structures for your Sass, and you certainly don’t need to read philosophical blog posts on different ways to structure you Sass folder structure.

There are many points of view on setting up Sass - different ways to break down functionality, folder structures, partials, etc. When I was just starting out I got bogged down and distracted by it all and it added to my confusion and blocked me from getting up and running quickly. My advice is to start with the bare bones outlined above and build your way up to a full Sass structure.

If/when however, you’re at the point where you’re looking to break down your SCSS into multiple files (and you’ll get there relatively soon after getting up and running), below are some interesting and useful posts on how to structure your Sass project:

I hope you’ve found this post helpful, and feel free to tweet me @christinaent to let me know your thoughts and share any other resources you’ve found interesting so I can add them to this list!

The Tree Data Structure

During the junior developer panel at Flatiron School, when asked about typical interview questions, one of the panelists mentioned that they were asked to “write a function that gets the depth of a tree.” I hear and read about trees often and I don’t really know what they are, so I thought this was a good opportunity to learn a little bit about trees!

Trees in Cracking The Coding Interview

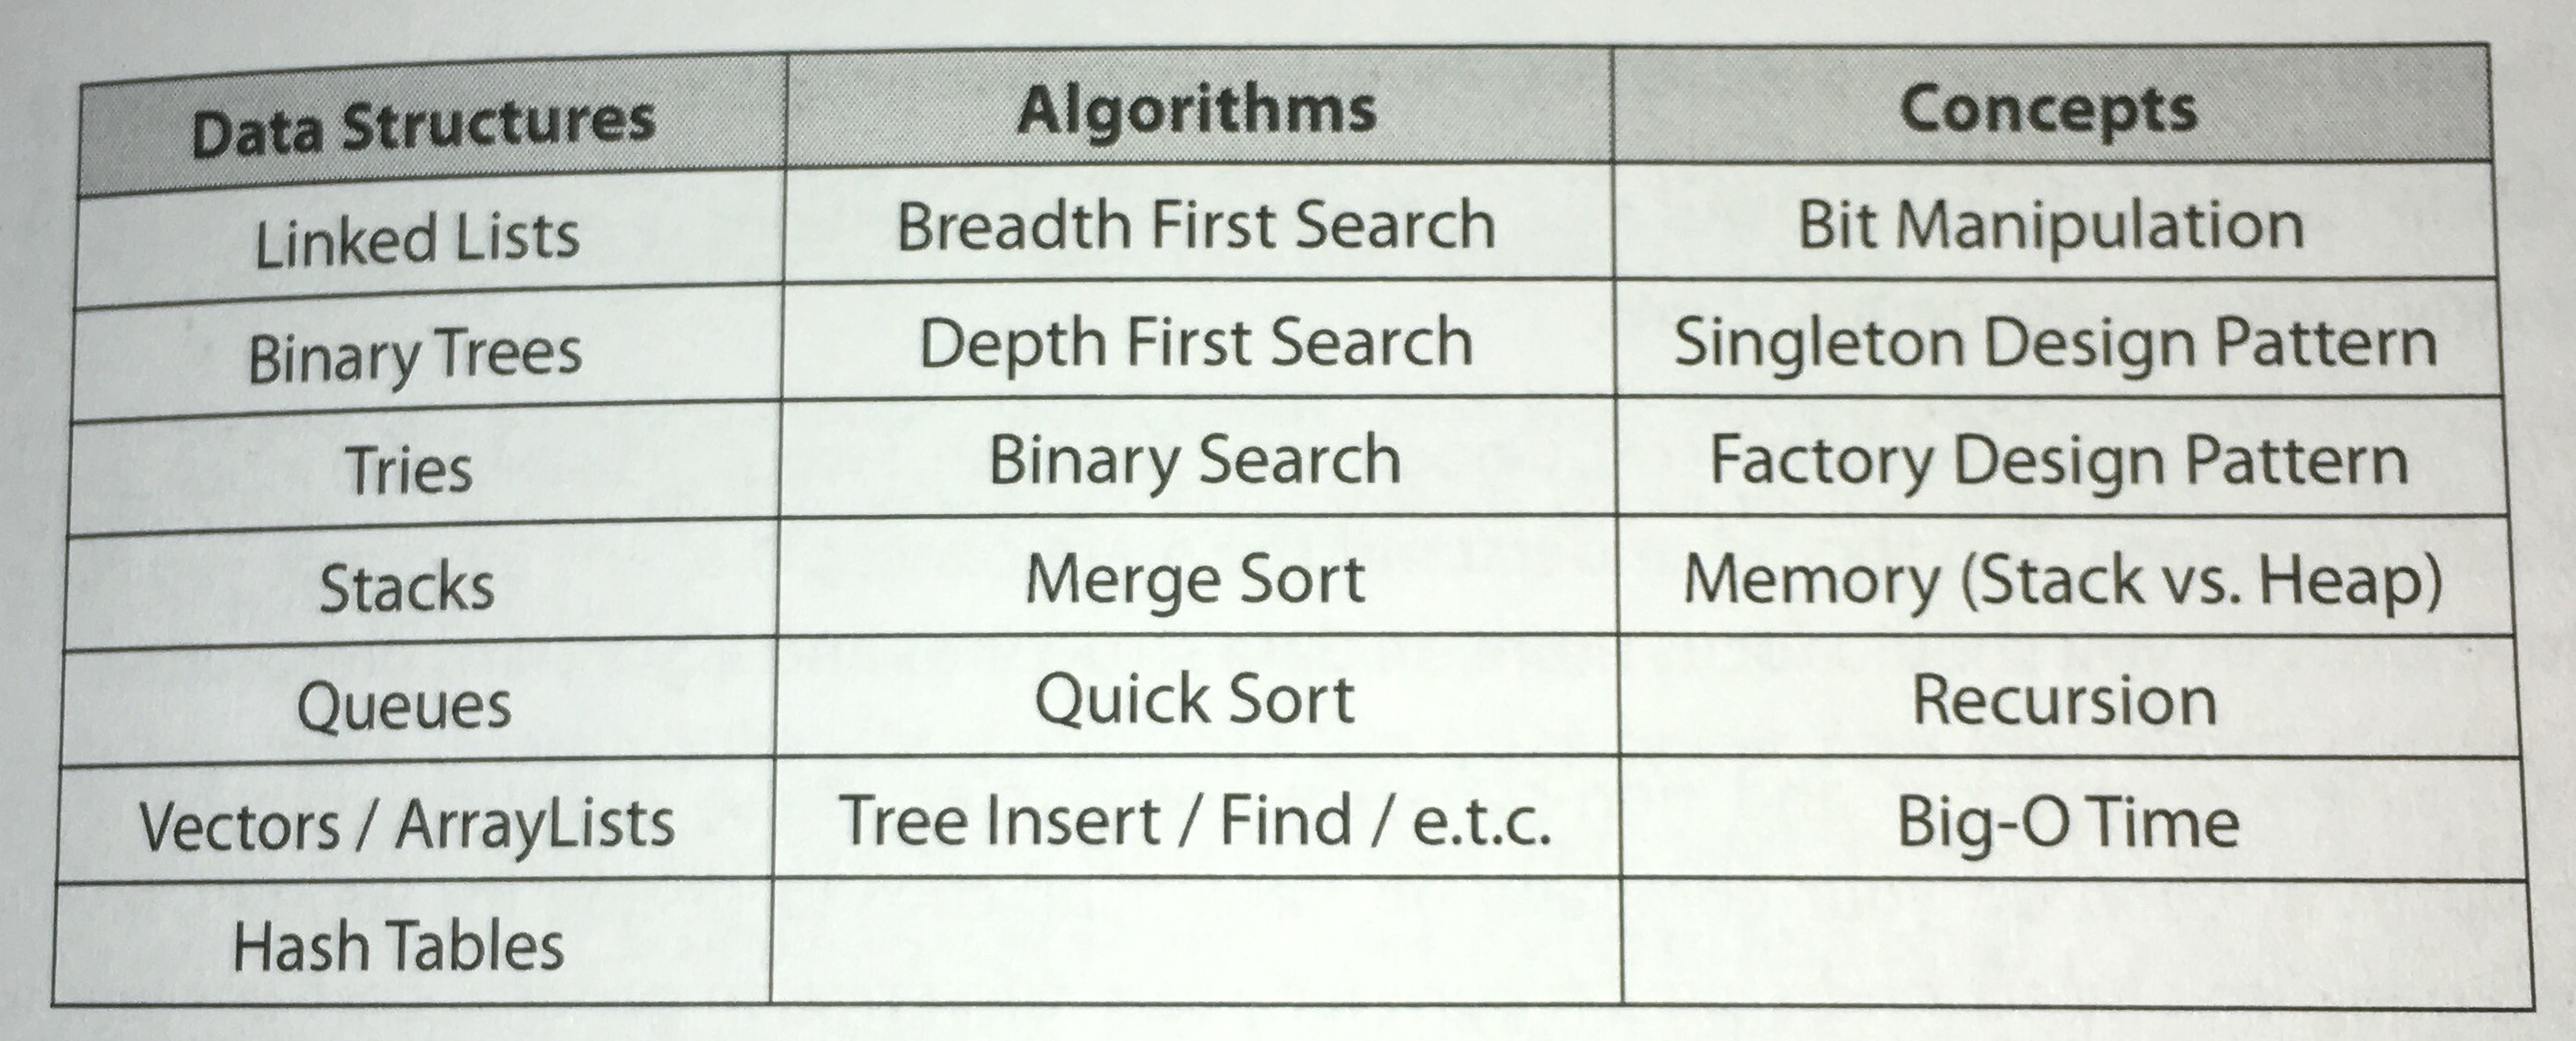
On page 47 (10% into the book) of Cracking the Coding Interview, Gayle Laakmann McDowell outlines the “absolute must have basics” of data structures and algorithms to know for an interview:

Caveats

I want mention that while this book is really useful and comprehensive, it is seemingly geared toward the “Stanford Big Four” set - kids who graduated from Stanford and are vying to work at Google, Facebook, Apple, or Microsoft. That’s not my lifestyle or what I’m interested in, but in any case it’s a very interesting book, and it’s good to know what Silicon Valley is expecting. As we heard in the junior developer panel, it’s likely that you will be asked CS questions during the interview process.

Tree basics

As an introduction, my goal for this post is to share:

  1. definitions and differences between tree and binary tree data structures
  2. real life examples of general trees
  3. overview of two techniques to traverse a tree

What a tree is not

A tree is not a linearly organized data structure, like an array or a linked list. A data structure is said to be linear if its elements form a sequence. A hash is also not a linearly organized data structure because its order of return cannot be guaranteed.

General trees

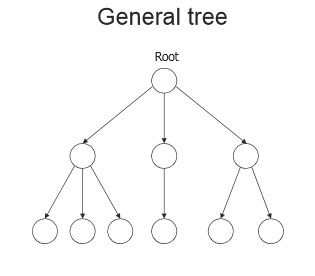
A general tree is a data structure with nodes. There is no limit on the degree of nodes in a general tree, and each node can have an infinite number of children.

Real life examples of general trees:

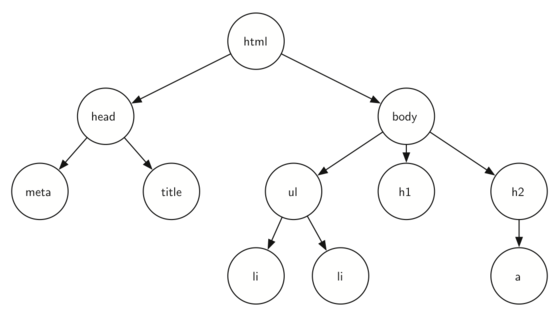
The DOM

Phylogenetics (the study of the evolutionary history)

Binary trees


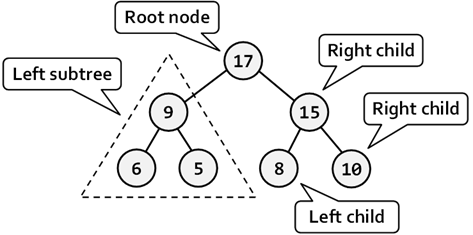
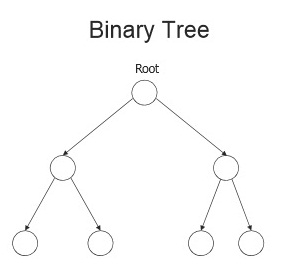
A binary tree is a data structure in that each node has at most two nodes: left and right.

Real life examples of binary trees:

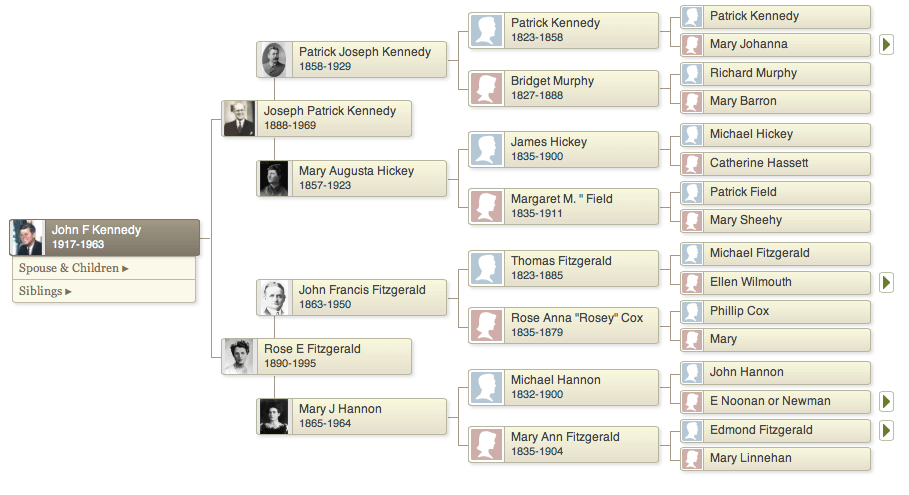
Family tree

Advantages of trees

Trees are useful and frequently used because they have some advantages:

  • Trees reflect structural relationships in the data
  • Trees are used to represent hierarchies
  • Trees provide an efficient insertion and searching
  • Trees are very flexible data, allowing to move subtrees around with minimum effort

Techniques for traversing a tree

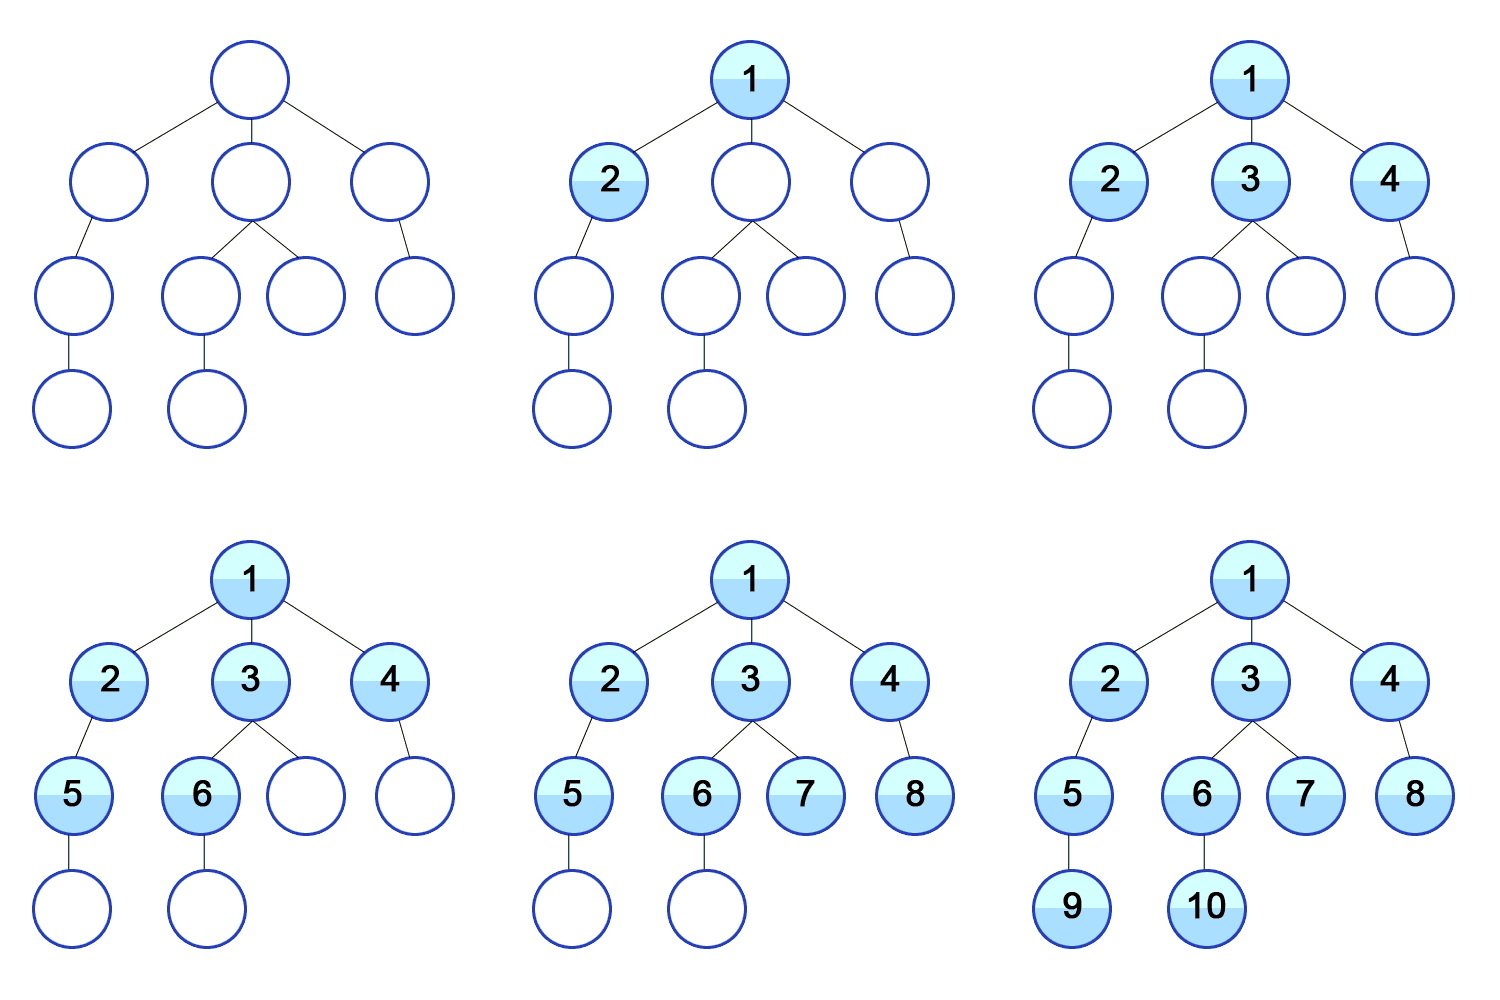
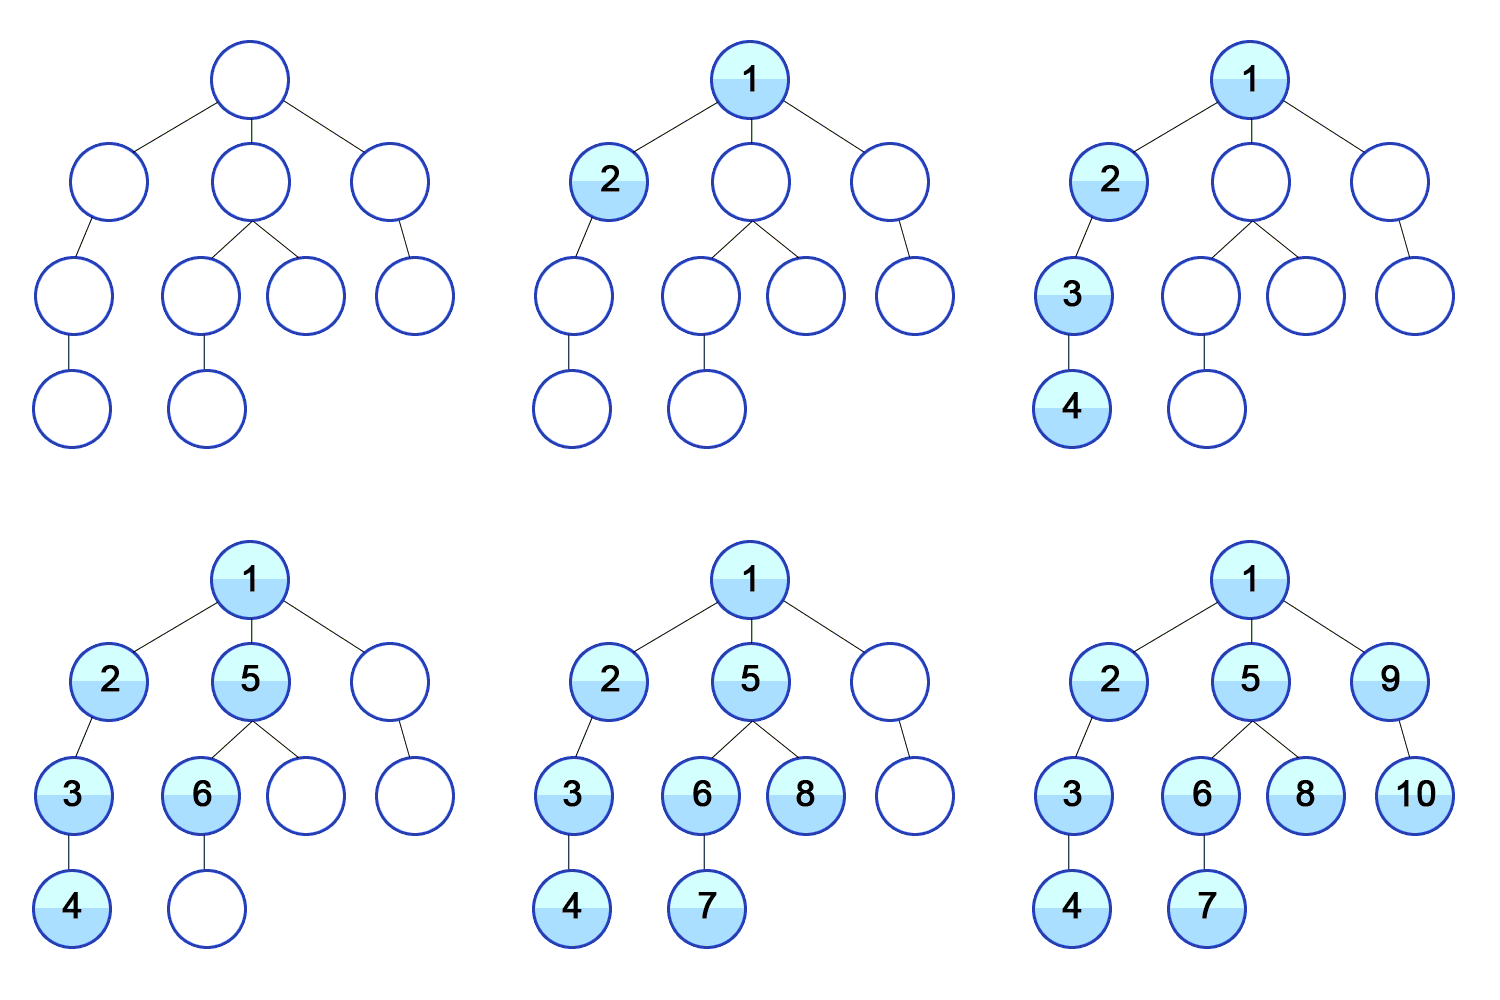
Traversing a tree can either take a breadth-first or a depth-first approach.

Explores the neighbor nodes first, before moving to the next level neighbors.

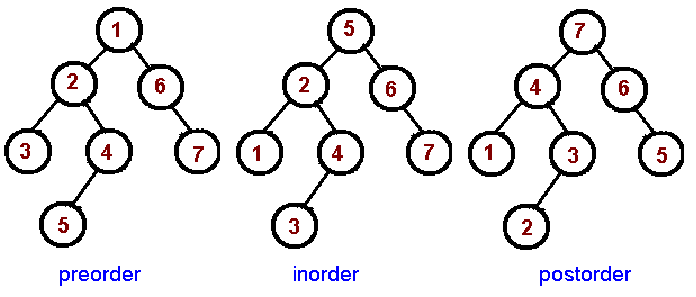
There are three different types of depth-first traversals:

  • PreOrder traversal - visit the parent first and then left and right children
  • InOrder traversal - visit the left child, then the parent and the right child
  • PostOrder traversal - visit left child, then the right child and then the parent

Explores all the children of a neighboring node before moving to the next neighbor and its children.

There is only one kind of breadth-first traversal:

  • Level order traversal. This traversal visits nodes by levels from top to bottom and from left to right.

Simple tree example in our Flatiron School curriculum

We have encountered trees in our Flatiron School curriculum. In the Hide and Seek lab, we traversed the DOM to find specific nodes using document.querySelector() and document.querySelectorAll(). The deepestChild function can be easily amended to return the depth of the tree as opposed to just returning the deepest child.

Reference

Binary tree - Wikipedia
https://en.wikipedia.org/wiki/Binary_tree

Data Structures With JavaScript: Tree
https://code.tutsplus.com/articles/data-structures-with-javascript-tree--cms-23393

Binary Trees - Carnegie Mellon University
https://www.cs.cmu.edu/~adamchik/15-121/lectures/Trees/trees.html

Girl Develop It, Intro to Algorithms
http://www.teaching-materials.org/algorithms/#/

The DOM Is A Tree
https://learn.co/tracks/web-development-immersive-winter-2016/javascript/the-dom/the-dom-is-a-tree

Falsehoods Programmers Believe

“Falsehoods Programmers Believe” is a collection compiled by Kevin Deldycke at Awesome Falsehood. Falsehoods Programmers Believe are misconceptions or assumptions than can negatively impact programming decisions and our codebase. There are falsehoods in many categories including human identity, shopping, music, date and time, and more.

The initial blog post that started it all is titled Falsehoods Programmers Believe About Names by Patrick McKenzie. In the post McKenzie says, “Anything someone tells you is their name is — by definition — an appropriate identifier for them.”

In the classic How to Win Friends and Influence People Dale Carnegie says, “a person’s name is, to that person, the sweetest and most important sound in any language.”

However, the systems we design as programmers often fail to acknowledge this fundamental aspect of a person’s identity.

“Your last name contains invalid characters”

John Graham-Cumming’s blog post “Your last name contains invalid characters” describes his personal experience and frustration with how web forms handle his hyphenated last name. The hyphen in his last name is often treated by many web forms as invalid input.

He says, “Does the web site have any idea how rude it is to claim that my last name contains invalid characters? Clearly not. What they actually meant is: our web site will not accept that hyphen in your last name. But do they say that? No, of course not. They decide to shove in my face the claim that there’s something wrong with my name.”

Additionally, some web forms will accept the hyphen in his name but have rules about how to deal with what comes after the hyphen. Graham-Cumming says, “Yahoo oddly believes that I don’t know how to type my own name and decides to lowercase the C in Cumming. It’s willing to accept the hyphen but not that I know who I am.”

Graham Cumming’s experiences are just one example of how our own preconceptions can fail in the wild, and additionally add insult to injury with “suggestions” for customers who do not fit into our preconceived mold.

Graham-Cumming continues, “There’s nothing wrong with my name […] What is wrong is the way this is being handled. If the system can’t cope with non-letters and spaces it needs to say that. […] So, form designers: stop blaming the user for your inadequacies.”

“Hello, I’m Mr. Null. My Name Makes Me Invisible to Computers”

Christopher Null writes in WIRED about his experience with web forms due to his last name. As programmers likely know, the word null is a reserved keyword that in some languages is used to indicate that a data value does not exist.

For Null, entering his last name into a web form is often invalid - the form will prompt him to reenter a last name, with the error message that the last name cannot be left blank. For these cases, Null has come up with a workaround - he amends his last name to use it in combination with a middle name, or adds a period at the end, i.e. “Null.”

Null also mentions that he frequently receives letters in the mail with his last name omitted, or addressed to simply “Mr.”

Uncovering falsehoods

While the Null case may be a less egregious oversight from a cultural perspective, Christopher Null’s plight highlights yet another programmatic oversight that consequently rejects of one of the most fundamental aspects of a person’s identity.

As programmers, in our quest to prevent bad data from entering our database, we can often end up making poor decisions or overlooking realities that result in exclusion of individuals, whole groups, or at the very least end up causing frustration for customers.

The potential for these blind spots is just one business case for why diversity in the workplace is so important. With a more diverse team comes a variety of background and experience, and consequently less risk for potential blindspots and errors.

Reference

Awesome Falsehood, Kevin Deldycke
https://github.com/kdeldycke/awesome-falsehood

Falsehoods Programmers Believe About Names, Patrick McKenzie
http://www.kalzumeus.com/2010/06/17/falsehoods-programmers-believe-about-names/

“Your last name contains invalid characters”, John Graham-Cumming
http://blog.jgc.org/2010/06/your-last-name-contains-invalid.html

“Hello, I’m Mr. Null. My Name Makes Me Invisible to Computers”, Christopher Null
https://www.wired.com/2015/11/null/

A Brief Introduction to Algorithms and Big-O Notation

Algorithms are a fundamental part of programming, computer science, and often, job interviews. As beginner programmers, algorithms can be daunting, but whether we realize it or not we’re already implementing them in different ways through the decisions we make in our code.

What are algorithms?

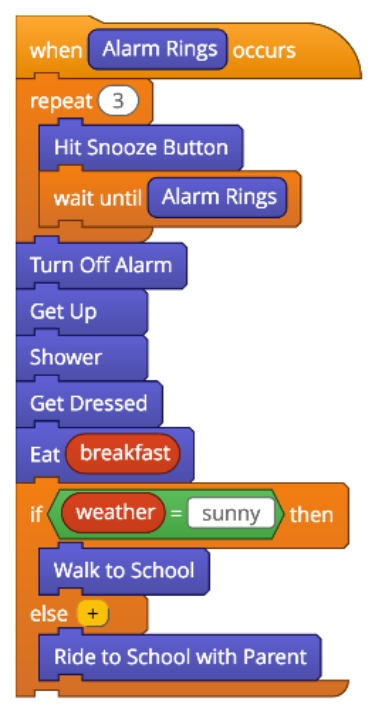
An algorithm is any repeatable process for finding the solution to a problem. If you can outline how to get to the solution step-by-step, and if you can replicate those results, you are probably using an algorithm.

Algorithms in every day life

Algorithms don’t have to be scary - there are many algorithms at play in every-day life. Some basic algorithms include:

  • A recipe for baking cookies
  • Reorganizing your closet
  • Your morning routine

Why do algorithms matter?

There are many algorithms, and each one has a different impact on how long your code takes to run, and how much memory it takes to run. That may not make a huge difference for our code today, but as our applications grow bigger and more complex it becomes increasingly important to assure that we’re writing code that’s efficient - that is, code that’s fast and does not take up a lot of space.

You can imagine that customers expect the websites, mobile apps, and other applications to load fast and not eat up tons of memory.

Algorithm efficiency and space/time complexity

Algorithm efficiency is measured in time and space complexity. Time complexity looks at how long an algorithm takes to solve, and space complexity is concerned with how much memory the algorithm takes to run. We usually end up talking more about time complexity, since space is usually more readily available than patience.

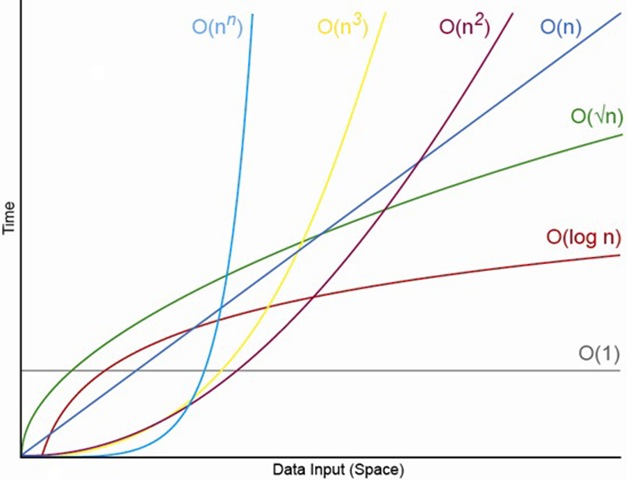
Let’s tackle time complexity through a mathematical framework called Big O notation:

Big-O Notation

In simple terms, according to Simple English Wikipedia, “Big O Notation is a way of saying how much time it takes for a mathematical algorithm to run or how much memory it uses.”

Three examples and their Big O time complexity:

Example 1: Look up an element in an array:

1
2
3
4
5
6
cats = [“Lil Bub”, “Maru”, “Venus"]
cats[2]
more_cats = [“Garfield”, “Felix”, “Lil Bub”, “Maru”, “Mr. Jinks”,
“Venus”, “Nyan Cat”, “Stimpy"]
more_cats[2]

In the above example, the Big O time complexity is O(1) constant in that it takes the same amount of time regardless of input size. If the array was twice the size, the time it takes to run would be the same since we are always looking for the second element in the array.


Example 2: Iterate over an array:

1
2
3
4
5
cats = ["Garfield", "Felix", "Lil Bub", "Maru", "Mr. Jinks",
"Venus", "Nyan Cat", "Stimpy"]
cats.each do |cat|
puts "I'm petting #{cat}"
end

In the above example, the Big O time complexity is O(n) linear in that the time it takes corresponds to the size of the input. If the array was twice the size, the time it takes to run also grows, so it would take twice as long.


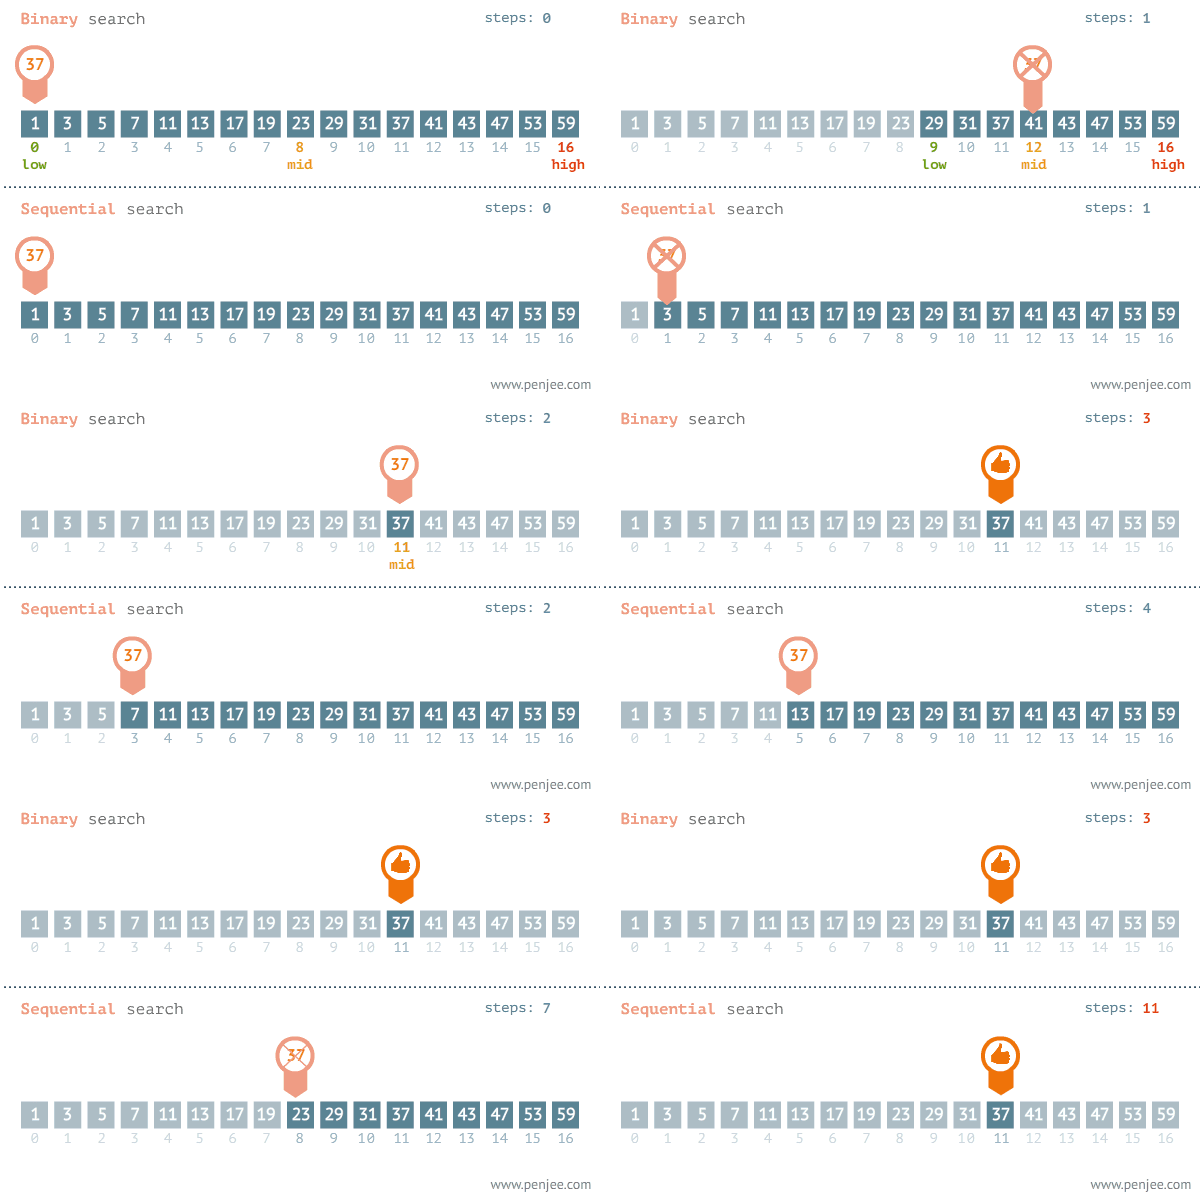
Example 3: Binary search on a sorted array:

Binary Search

In the above example, the Big O time complexity is O(log n) logarithmic in that the time it takes is divided by half each time. In this case, the algorithm is actually more efficient over time since the size of the array we have to search is cut in half each time.


There are many more Big O notation complexities, and tons of algorithms. A handy tool for Big O is the Big O Cheat Sheet, linked below.

Reference

Big O Notation, Simple English Wikipedia
https://simple.wikipedia.org/wiki/Big_O_notation

Big O Cheat Sheet
http://bigocheatsheet.com/

Girl Develop It, Intro to Algorithms
http://www.teaching-materials.org/algorithms/#/

CodeNewbie, Episode 103: Algorithms
http://www.codenewbie.org/podcast/algorithms

Cracking the Coding Interview, Gayle Laakmann McDowell
https://www.careercup.com/book

The Algorithm Design Manual, Steven Skiena
http://www.algorist.com/

Introduction to Algorithms, CLRS
https://mitpress.mit.edu/books/introduction-algorithms


Powered by Hexo and Hexo-theme-hiker

Copyright © 2016 - 2017 Adventures In Coding & Algorithms All Rights Reserved.

© Christina Entcheva 2016